LOADING...

加载过慢请开启缓存(浏览器默认开启)

loading

mynote

个人笔记

Layout布局

ElementUI 2022/7/8

Layout布局:

间隔 通过gutter来指定

 <el-row :gutter="20" style="margin-top: 30px">
      <el-col :span="8" class="box">1</el-col>
      <el-col :span="8" class="box">1</el-col>
      <el-col :span="8" class="box">1</el-col>
    </el-row>
    <el-row :gutter="20" style="margin-top: 30px">
      <el-col :span="8" style="height: 30px; background: #ccc">1</el-col>
      <el-col :span="8" style="height: 30px; background: #ccc">1</el-col>
      <el-col :span="8" style="height: 30px; background: #ccc">1</el-col>
    </el-row>
    <el-row :gutter="20" style="margin-top: 30px">
      <el-col :span="8"><div class="box">1</div></el-col>
      <el-col :span="8"><div class="box">1</div></el-col>
      <el-col :span="8"><div class="box">1</div></el-col>
    </el-row>
    <el-row :gutter="20" style="margin-top: 30px">
      <el-col :span="8">1</el-col>
      <el-col :span="8">1</el-col>
      <el-col :span="8">1</el-col>
    </el-row>

一开始我觉得是样式的原因,通过上图可以看出,无论时使用样式选择器,还是直接写style样式,gutter都会失效

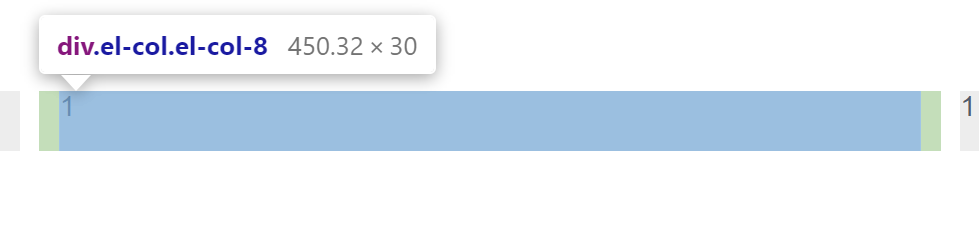
后来发现,gutter的实现是由el-col上的padding实现的,饿了么给每个el-col左右指定了相同的padding,里面使用一个盒子,我们看到的其实是里面这个盒子的宽度,因此使用时需要在el-col里使用一个div将我们要写的内容包裹起来,否则gutter会失效,在此div上写样式就没问题了

阅读全文

深度选择器

2022/7/8

大佬原博

另一大佬原博

在编译组件的时候,如果当前组件内style标签上有scoped属性,那么会在当前所有标签上添加一个【data-v-hash】属性,而当前样式表内的所有末尾选择器后面也会加上该属性,那么就使得当前组件内的样式只会作用于当前组件内的元素。

1、>>>:只作用于css

  .allfunctions-container >>> .el-upload-list {
    margin-bottom: 50px;
  }

2./deep/:作用域sass less css,注意:vue-cli3以上版本不可以

 .bid-securityfund-container /deep/.el-table-filter__bottom button:hover {
    color: #42989f;
  }

3、::v-deep 如果使用了预处理器都可以使用

  ::v-deep .el-table th.el-table__cell > .cell.highlight {
    color: #42989f;
  }
阅读全文

鼠标相关的一些事件

鼠标右键: @contextmenu.prevent=”handleMemberEditShow(index, $event)”

鼠标移入移出事件大佬原博

1.mouseover 和 mouseout

2.mouseenter 和 mouseleave

1.mouseover 和 mouseout:根据鼠标事件的target进行触发,是一种精确触发。

当为某一组件(如div或ul)设置这两个事件时,当事件的target是该组件时,就会触发mouseover,但是当鼠标划到该组件的子组件上时,因为target改变了,所以就触发了 mouseout 事件,这往往就会造成页面元素的闪烁。
在实际开发过程中,更多的是针对范围的操作。如果鼠标在某个组件(如div)范围内就触发进入组件的操作,如果离开这个组件的页面范围,就触发离开的事件。

2.mouseenter 和 mouseleave:根据组件在页面的范围(坐标)进行触发的。

不管组件中是否有子组件,只要鼠标进入到组件的范围内,就可以触发mouseenter事件,离开范围,则触发mouseleave事件。

鼠标右键(案例:鼠标右键弹出编辑删除,再次右键隐藏)

要求:右键小盒子出现,再次右键小盒子消失。

思路:当memberIndex与当前index相同时,让小盒子出现,否则隐藏。

遍历每个li,右键时传递当前点击的li的index,让this.memberIndex = index,两者相同盒子出现。再次点击时让 this.memberIndex = -1,两者不相同,盒子消失


    <ul style="padding-right: 9px; height: 175px; overflow: auto">
            <li
              v-for="(user, index) in userList"
              :key="user.id"
              :class="memberIndex === index ? 'teamactive' : ''"
              @contextmenu.prevent="handleMemberEditShow(index, $event)"
              @mouseleave="hiddenBox2"
            >
              <div>
                {{ user.name.slice(0, 1) }}
              </div>
              <div>
                {{ user.name }}
              </div>
              <div
                style="font-size: 14px; color: #2864d7; float: right"
              >
                {{ user.role }}
              </div>
              <div
                class="deatils"
                :class="
                  memberIndex === index && myrole == '组长'
                    ? 'active'
                    : 'hidden'
                ">
                <div @click="deleteMember(user)" >
                  移除
                </div>
                <div @click="setLeader(user)">
                  设为副组长
                </div>
              </div>
            </li>
          </ul>
          
   data() {
      return {
        memberIndex: -1,
      }
    },
                  
      handleMemberEditShow(index, e) {
        if (index != this.memberIndex) {
          this.memberIndex = index
        } else {
          this.memberIndex = -1
        }
      },

鼠标移入移出(鼠标移除当前li后,盒子消失)

还是这个案例,如果用mouseout,点击编辑时,因为进入了子组件,会被认为鼠标离开,因此盒子消失,因此这里应该使用mouseleave

           <li
              v-for="(user, index) in userList"
              :key="user.id"
              :class="memberIndex === index ? 'teamactive' : ''"
              @contextmenu.prevent="handleMemberEditShow(index, $event)"
              @mouseleave="hiddenBox2"
            >
 
       hiddenBox2() {
        this.memberIndex = -1
      },
阅读全文

Echarts的一些配置项

2022/7/5

title:标题

主标题和副标题
title: {
    text: '主标题',
    subtext: '副标题',
    top: 10,
    left: 10
  },
  也可以多个标题
   title: [ {
     text:'标题1',
     left:20,
     show:false//是否显示标题
   },
   {
     text:'这是一个长长的标题,可以换行\n哈哈',//标题文本,支持换行
     left:20,
     top:40,
    textStyle:{//文本样式
      color:'skyblue',
      fontSize:20,
    }
   }],

legend

 legend: {
            orient: 'vertical',//图例方向
            icon: 'circle',//
            type:'scroll',//图例过多时可滚动,默认plain
            itemWidth: 8, // 设置宽度
            itemHeight: 8, // 设置高度
            itemGap: 15, // 设置间距
            left: 'right',//图例组件离容器左侧的距离,可为像素值,百分比,center等
            //top:'40%',//图例组件离容器上侧的距离,同上
            bottom:'10%',//百分比或像素值,right相同
            show:true,//是否显示图例
            width:120,//图例组件的宽度。默认自适应。
            height:200,//图例组件的高度。默认自适应。
            padding: [5, 10],
            formatter: function (name) {
                let data = option.series[0].data
                let total = 0
                let tarValue
                for (let i = 0; i < data.length; i++) {
                   total += data[i].value
                   if (data[i].name === name) {
                    tarValue = data[i].value
                    }
                  }
               let v = tarValue
                return name+v+'元'
            },
            textStyle: {
              fontWeight: 400,
              fontSize: 14,
              color: '#606266',
            },
          },
          或
             legend: {
             orient: 'vertical',
             icon: 'circle',
             itemWidth: 8, // 设置宽度
             itemHeight: 8, // 设置高度
             itemGap: 15, // 设置间距
             left: '45%',
             textStyle: {
               fontWeight: 400,
               fontSize: 14,
               color: '#606266',
               rich: {
               one: {
                   fontSize: 14,
                   fontWeight: 400,
                   fontFamily: 'Microsoft YaHei-Regular, Microsoft YaHei',
                   width: 110,
                   color: '#606266',
                   padding: [0, 0, 0, 4],
                 },
                 two: {
                   fontSize: 14,
                   fontWeight: 400,
                   color: '#606266',
                 },
               },
             },
           },
             formatter: function (name) {
             let data = option.series[0].data
             let total = 0
             let tarValue
             for (let i = 0; i < data.length; i++) {
               total += data[i].value
               if (data[i].name === name) {
                 tarValue = data[i].value
               }
             }
             // 数量
             let v = tarValue
             // 百分比
             let p = Math.round((tarValue / total) * 100)
             return `{one|${name}} {two|${number_format(v, 0)}元}`
           },
阅读全文

Vuex

2022/6/13

Vuex介绍

1.概念:Vuex是Vue中实现集中式状态(数据)管理的Vue插件,对vue应用中多个组件的共享状态进行集中式管理(读/写),也是一种组件间通信的方式,且适用于任意组件间通信

2.何时使用:多个组件需要共享数据时

3.搭建vuex环境:1.创建文件:src/store/index.js

//引入Vue核心库
import Vue from 'Vue'
//引入Vuex
//import Vuex from 'vuex'
//应用Vuex插件
Vue.use(Vuex)

//准备actions:用于响应组件中的动作
const actions={}
//准备mutations:用于操作数据(state)
const mutations={}
//准备state:用于存储数据(state)
const state={}

//创建并暴露store
export default new Vuex.Store({
    actions,
    mutations,
    state
})

2.在main.js中创建vm时传入store配置项

//引入store
import store from './store'
//创建vm
new Vue({
    el:'#app',
    render:h=>h(App),
    store
})

使用案例:

context:minstore,缩水的store

1.组件中读取vuex中的数据:$store.state.sum

2.组件中修改vuex中的数据:$store.dispatch('action中的方法名',数据)$store.commit('mutations中的方法名',数据)

3.如果没有网络请求或其他业务逻辑,组件中也可以越过actions,即不写dispatch,直接写commit,actions中,如果业务逻辑过于复杂,可以拆分成几个函数,不断dispatch调用新的函数去执行

4.getters的使用:

1.概念:当state中的数据需要经过加工后再使用时,可以使用getters加工

2.再store.js中追加gettres配置

const getters={
    bigSum(state){
        return state.sum*10
    }
}
export default new Vuex.store({
    getters
})

组件中读取数据:$store.getters.bigSum

5.四个map方法的使用:mapState、mapGetters、mapActions、mapMutations

**1.mapState:**用于帮助我们映射state中的数据为计算属性

computed:{
    //借助mapState生成计算属性:sum、school、subject(对象写法)
    ...mapState({sum:'sum',school:'school',subject:'subject'})
    //借助mapState生成计算属性:sum、school、subject(数组写法),计算属性的名字需要和state中的Key一致
    ...mapState(['sum','school','subject'])
}

2.mapGetters方法:用于帮助我们映射getters中的数据为计算属性

computed:{
    //借助mapGetters生成计算属性:bigSum(对象写法)
    ...mapGetters({bigSum:'bigSum'})
    //借助mapGetters生成计算属性:bigSum(数组写法)
    ...mapGetters(['bigSum'])
}

**3.mapActions:**用于帮助我们生成与actions对话的方法,即:包含$store.dispatch(xxx)的函数

methods:{
    //靠mapActions生成:incrementOdd、incrementWait(对象形式)
    ...mapActions({incrementOdd:'jiaOdd',incrementWait:'jiaWait'})
    //靠mapActions生成:incrementOdd、incrementWait(数组形式),方法名需要与actions中的相同
    ...mapActions(['jiaOdd','jiaWait'])
}

**4.mapMutations:**用于帮助我们生成与mutations对话的方法,即包含$store.commit(xxx)的函数

methods:{
    //靠mapActions生成:increment、decrement(对象形式)
    ...mapActions({increment:'JIA',decrement:'JIAN'})
    //靠mapActions生成:increment、decrement(数组形式)
    ...mapActions(['JIA','JIAN'])
}

**备注:**mapActions与mapMutations使用时,若需要传递参数:在模板中绑定事件时传递参数,否则参数是事件对象

阅读全文

Vue插槽

2022/6/10

插槽

1.作用:让父组件可以向子组件指定位置插入html结构,也是一种组件间通信的方式,适用于父组件===》子组件

2.分类:默认插槽、具名插槽、作用域插槽

3.默认插槽

父组件中:
<Category>
     <div>html结构</div>
</Category>

子组件中:
<div>
     <slot>插槽默认内容,如果父组件给插槽传递数据,则展示传递的html结构,否则展示默认内容</slot>
</div>

4.具名插槽:

父组件中:
<Category>
     <div slot="center">   指定插槽的名称
          <div>html结构</div>
     </div>
      <template v-slot:footer>  指定插槽的名称,但v-slot:footer只能使用在template标签上
          <div>html结构</div>    使用template标签,解析时该标签不会出现在html结构中
     </template>
      <template slot="footer">  template也可以直接使用slot="footer",两种方式皆可
          <div>html结构</div>    可以往footer插槽多次指定内容
     </template>
</Category>

子组件中:
<template>
     <div>
          <slot name="center">插槽默认内容</slot>
          <slot name="footer">插槽默认内容</slot>
     </div>
</template>

5.作用域插槽:

理解:数据在子组件自身,但根据数据生成的结构需要父组件来决定(比如games数据在category组件中,但使用数据遍历出来的结构由父组件App决定)

父组件中:
<Category>
     <template scope="scopeData">   用scope接收子组件传递过来的数据   
           <ul>
              <li v-for="g in scopeData.games" :key="g">{{g}}</li>
           </ul>
     </template>
</Category>
<Category>
     <template scope="{games}">   
           <ol>
              <li v-for="g in games" :key="g">{{g}}</li>
           </ol>
     </template>
</Category>
<Category>
     <template slot-scope="{games}">  scope与slot-scope均可用来接收数据,使用方法相同 
              <h3 v-for="g in games" :key="g">{{g}}</h3>
     </template>
</Category>

子组件中:
<template>
     <div>
          <slot :games="games">插槽默认内容</slot> 通过:games="games"给父组件传递数据,这里也可                                                                       以使用具名插槽,不冲突
     </div>
</template>

export default{
    data(){
        return{
            games:['1','2','3']
        }
    }
}
阅读全文

Vue中配置代理、vue-Resource插件

2022/6/9

vue中配置代理

方法一(配置单个代理):

在vue.config.js中添加如下配置:

module.exports={
    devServer:{
    proxy:"http://localhost:5000"
    }
}

请求:
getSrudent(){
    axios.get('http://localhost:8080/students').then(
    response=>{
        console.log("请求成功",response.data)
    },
    error=>{
        console.log("请求失败",error.message)
    }
    )
}

1.优点:配置简单,请求资源时直接发送给前端(8080)即可

2.缺点:不能配置多个代理,不能灵活的控制请求是否走代理

3.工作方式:按如上方式配置代理时,当请求了前端不存在的资源时,该请求会转发给服务器(优先匹配前端资源)

方法二(配置多个代理):

在vue.config.js配置具体代理规则:

module.exports={
    devServer:{
        proxy:{
            '/api1':{//匹配所有以'/api1'开头的请求路径
                target:'http://localhost:5000',//代理目标的基础路径
                changeOrigin:true,
                pathRewrite:{'^/api1':''}
            },
             '/api2':{//匹配所有以'/api2'开头的请求路径
                target:'http://localhost:5000',//代理目标的基础路径
                changeOrigin:true,
                pathRewrite:{'^/api2':''}
            }
        }
    }
}

请求:
getStudents(){
 axios.get('http://localhost:8080/api1/students').then(
    response=>{
        console.log("请求成功",response.data)
    },
    error=>{
        console.log("请求失败",error.message)
    }
    )    
},
getCars(){
 axios.get('http://localhost:8080/api2/cars').then(
    response=>{
        console.log("请求成功",response.data)
    },
    error=>{
        console.log("请求失败",error.message)
    }
    )    
},

1.优点:可以匹配多个代理,且可以灵活的控制请求是否走代理

2.缺点:配置略微繁琐,且请求资源时必须加前缀

react中配置多条代理的方法:

在src目录下新建setupProxy.js文件

const { createProxyMiddleware } = require('http-proxy-middleware')

module.exports = function (app) {
    app.use(createProxyMiddleware('/g2', {
        target: 'https://view.inews.qq.com',
        changeOrigin: true,
    }))
    app.use(createProxyMiddleware('/api', { // 遇见 /api 前缀的请求 就会触发该代理配置
        target: 'http://localhost:9999/',// 请求转发给谁
        changeOrigin: true// 控制服务器接收到的请求头Host的值
    }))
    app.use(createProxyMiddleware('/news', {
        target: 'https://interface.sina.cn/',
        changeOrigin: true,
    }))
    app.use(createProxyMiddleware('/ncov', {
        target: 'http://api.tianapi.com/',
        changeOrigin: true,
    }))
    app.use(createProxyMiddleware('/pages', {
        target: 'https://api.webhunt.cn/api/v1',
        changeOrigin: true,
    }))

}

具体请转:https://www.freesion.com/article/2055333464/

跳转地址

Vue-resource

1.下载vue-resource: npm i vue-resource

2.在main.js中引入并挂载:import vueResource from ‘vue-resource’

​ Vue.use(vueResource)

3.使用:使用方法与axios相同,不过通过this.$http发送请求

 this.$http.get('http://localhost:8080/api1/students').then(
    response=>{
        console.log("请求成功",response.data)
    },
    error=>{
        console.log("请求失败",error.message)
    }
    )    
阅读全文

Vue封装的过渡与动画

2022/6/9

Vue封装的过度与动画

1.作用:在插入、更新或移除DOM元素时,在合适的时候给元素添加样式类名

2.图示:

3.写法:

1.准备好样式:

  • 元素进入的样式

    1. v-enter: 进入的起点
    2. v-enter-active: 进入的过程中
    3. v-enter-to: 进入的终点
  • ​ 元素离开时的样式

    1. v-leave: 离开的起点
    2. v-leave-active: 离开的过程中
    3. v-leave-to: 离开的终点

2.使用<transition>包裹要过度的元素,并配置name属性:

<transition name="hello">
    <h1>你好</h1>
</transition>

3.如果有多个元素需要过度,则需要使用:<transition-group>标签,且每个元素都要指定key值

阅读全文

nextTick

2022/6/8

this.$nextTick

1.语法:this.$nextTick(回调函数)

2.作用:在下一次DOM更新结束后执行其指定的回调

3.什么时候使用:当数据改变之后,要基于更新后的DOM进行某些操作时,要在nextTick所指定的回调函数中进行,如

this.$nextTick(function(){
    this.$refs.inputref.focus()//dom更新完毕后使输入框聚焦
})
阅读全文

消息订阅与发布

2022/6/8

消息订阅与发布(pubsub)

1.这是一种组件间通信的方式,适用于任意组件间通信

2.使用步骤:

  • 安装pubsub: npm i pubsub-js

  • 引入:import pubsub from ‘pubsub-js’

  • 接收数据:A组件想要接收数据,则在A组件中订阅消息,订阅的回调留在A组件自身

    methods(){
        demo(msgname,data){}//传递两个参数,第一个是订阅消息的名字,第二个才是传递的数据
    }
    mounted(){
        this.pid=pubsub.subscribe('xxx',this.demo)//订阅消息
        或  this.pid=pubsub.subscribe('xxx',()=>{})
    }
    

    提供数据:pubsub.publish(‘xxx’,数据)

    最好在beforeDestory钩子中,用pubsub.unsubscribe(this.pid)去取消订阅

阅读全文
avatar
参商
yyds
img_show